|
Although regarded as a
"black art" air conditioning isn't, so this is a layman's guide
for BFF members (and others) who have troubles with their air-con and
want to check as much as they can before calling in that man with the
gauges.
As a friend who started
out doing air-con with me once said, "Well it isn't quite Rocket
science is it!" Its not that complicated so I hope that some of you
will benefit from the words and pictures that I hope will give you a basic
insight into it and possibly help you along as well but just remember
that this is a simple guide, there is a lot more to it as I regularly
find out!
In its basic form as we
see it on Ag equipment it is quite simple when laid out in layman's terms,
which is the aim of this help page. Although problems may arise when you
throw in climate control and engine management found in some of today's
top end applications the basic principles are the same.
WARNING, DO NOT
DISCONNECT ANY FITTINGS OR PIPEWORK WITHOUT FIRST CHECKING THAT THERE
IS NO GAS IN THE SYSTEM WITH A SET OF TEST GAUGES.
REFRIDGERATION GAS WILL
GIVE YOU SEVERE FREEZE BURNS AT BEST.
The Basics.
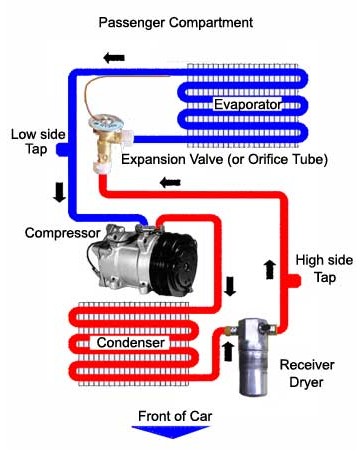 This
is a simple Air-con system. One pump, two radiators, a controlling valve
and a filter/dryer/tank in one. That's all there is in a basic set up. This
is a simple Air-con system. One pump, two radiators, a controlling valve
and a filter/dryer/tank in one. That's all there is in a basic set up.
The compressor(pump)
sucks GAS in from the blue pipe and compresses it from LOW pressure into
HIGH pressure because the red pipe into which it is pumped has a restriction
(either an Expansion valve or an Orifice tube).
A byproduct of this
is that it becomes extremely hot so it first passes through the CONDENSOR
which is cooled by the engine fan, this cools & condenses the gas
into a HIGH PRESSURE LIQUID which is stored & filtered in the receiver/filter
dryer.
The EXPANSION VALVE
or ORIFICE TUBE controls the amount of gas allowed into the BLUE low pressure
pipe, this rapid drop in PRESSURE causes the liquid to "boil off"
ie turn back into a gas, in doing so it becomes very cold and when it
passes through the EVAPORATOR on the way back to the compressor it will
absorb any warm/hot air blown through the evaporator by the vehicles heater/air-con
blower.
This system shows an
expansion valve with its capillary sensing tube picking up the temperature
in the blue pipe to open & shut the valve. In Orifice tube systems
there is no actual valve, just the tiny tube metering the liquid like
a carburetor jet. In most systems there will also be a thermostatic control
switch to regulate the desired temperature and pressure switch/s to sense
the low and high pressures that will need the compressor to be stopped.
There will also be a "Tap" or service point on both the low
pressure (blue) and the high pressure (red) sides.
In a normal system
the compressor should "cycle" ie start and stop as and when
system pressure demands
Basic maintence/what to do first!
Every Year or when you get a problem,
before anything else always complete these simple tasks.
Inspect the engine radiator and
the air-con condenser which is usually fitted in front of it, clear away
any debris as well as blowing out both.
Check that the compressor drive
belt is present and tight.
Remove and clean the cab air filter/s
then make access to the evaporator core so that you can see if the fins
require dust & lint removing. (a common problem that stops air flowing
through)
Inspect visually the pipe work to
see if there has been a leak (look for signs of air-con oil carried out
by the escaping gas) and see if the compressor clutch "clicks"
when you turn it on and off (engine stopped, ignition on)
Identification
The first job is to identify what
gas you are using, if your system is mid-late 90's onwards then it should
be safe to say that you are on the later ozone friendly R134a gas.
Before that the standard was R12 gas. Besides a sticker in the engine
bay stating what you have, you will be able 99% of the time to tell by
the two connections used to service the system. (the 1% is if someone
has converted old to new gas without fitting the new connectors as should
be done)
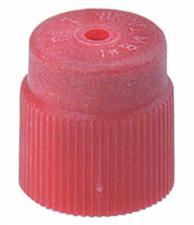  This
is the type of dust cap and connector fitting used on R134a systems. Caps
can be colour coded red & blue or just plain Black and in other styles
to that shown they have a central peg inside with the threads to screw
into the connector. This
is the type of dust cap and connector fitting used on R134a systems. Caps
can be colour coded red & blue or just plain Black and in other styles
to that shown they have a central peg inside with the threads to screw
into the connector.
 Also
shown here is the type of connector used to service the system, note the
collar with QRC type connector and the red coloured knob to open the system
connector valve. Note-They use different size connectors to prevent getting
the High and Low pressure service hoses mixed up. Also
shown here is the type of connector used to service the system, note the
collar with QRC type connector and the red coloured knob to open the system
connector valve. Note-They use different size connectors to prevent getting
the High and Low pressure service hoses mixed up.
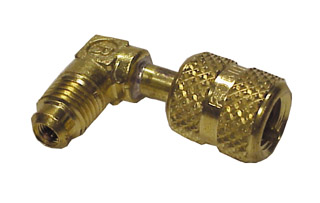 This
is an elbow adaptor that shows both the male and female fittings traditionally
used a lot in past in the A/C trade. This
is an elbow adaptor that shows both the male and female fittings traditionally
used a lot in past in the A/C trade.
Commonly found on test gauges, hoses,
etc. the male was also used as the service connection on the R12 systems,
it has the schrader valve core visible inside & the male connection
screws over it with a probe to open the valve.
If your system has been converted
to R134a then adaptors should of been fitted to convert the male to the
R134a type above.
What should happen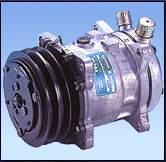
Start the engine. With
air-con switched off the compressor pulley(s) should be rotating with
the clutch at the front stationary, now switch on the air-con and blower
fan. The clutch should engage, you may hear the click but you should notice
a slight change in engine revs. Set the throttle to a fast idle, now hold
the two pipes connected to the compressor, you should notice that the
smaller one is getting hot and the fat one is getting colder?
Listen in case the
system cycles-ie the clutch releases, what you should get is the air being
blown through the evaporator in the cab becomes cold and with all the
doors shut it will pull the air temperature down to a point where the
thermostat will stop the system as it has reached maximum coldness, or
the amount that you have set it to.
As it warms in the
cab the system senses this and starts up again. The time taken between
cycling on and off will vary depending on how fast you have the blower
set, on high it may run continuously where as on slow it may be off more
than its on! running it on slow will give the coldest air as it has the
maximum time to get chilled right down and it is best to use this to prevent
the evaporator icing up-it needs time to warm to de-ice and running on
fast may ice it up to a point where the air-con stops working, you stop,
investigate, start working again and get a cold shower when the melted
ice pours out of the roof!
What you can do!
Not a lot really without
at least a set of test gauges and a bit of skill in understanding what
they are telling you.
But, something always
worth checking is the condition on the bearing that the compressor pulley
runs on, whip the belt off & spin the pulley to listen for any rumbling,
while you are there get an air line out & blow the dust out of the
pulley centre through the 3 threaded holes in the front of the clutch
and through the gaps around the clutch/pulley.
If you have tested
to see if the clutch engages but find it won't, check to see if you get
power to the feed wire going into the clutch coil near the front of the
compressor, if there is power & now clutch "click" then
measure the clutch air gap, on the common sanden compressor it is usually
between 15-30 thou, if its more it may be too big an air gap for the clutch
coil to pull the clutch plate into drive. The remedy is to remove the
shaft nut & pull the clutch off using the 3x 1/4unc threaded holes,
you will then find small shim washers on the end of the shaft that can
be removed to set the correct gap see
here for sanden PDF service manual Replacement of the pulley bearing
is not difficult and can also be done without degassing.
There is one aid to
seeing what the system is doing, usually in the top of the Filter/dryer,
or in the pipe work on the suction side can be found a sight glass through
which you can observe the pretty bubbles as the system works. A rough
guide is that when the clutch engages the cluster of bubbles that you
can see will rapidly disappear, on most systems you will see the odd one
or two going by and as long as these do not start turning into hoards
of bubbles then things are not too bad!!. If the low side pressure gets
nearer to the zero or vacuum point the bubble rate will increase rapidly,
this is a good indication that there is not enough gas in the system.
In the last few years
there has been the gradual appearance of DIY repair items, such as top-up
cans of gas and system additive kits. These are sometimes worth
a try but quite often unless you have a regular "leaky" system
that you know will be low on gas, it won't be worth the risk. Too much
gas can damage the system and possibly you in the process. So finally
I finish off by adding a few "FF Facts" for you.
R12 is now illegal
to use for maintence, although operating a system with it in is still
allowed.
99.9% of R12 systems
can be converted to R134a, although there will be a reduction in the efficiency
with the new gas.
Venting of a systems
old gas to atmosphere is taboo, wasteful because it can be cleaned for
reuse and there is also the handy benefit of being able to measure how
much gas there is in there when diagnosing difficult faults!
The Filter/dryer-Receiver/accumulator
contains a desiccant to absorb moisture, 3-4 years is a good age for replacing
them, after that you risk the desiccant breaking down & a system flush.
Replacing any major
component of the system will require the adding of refrigerant oil, to
replace oil that would of been inside the old component.
It is good practice
to replace the Filter/dryer-Receiver/accumulator after breaking open the
system for servicing/repairs, the new desiccant in them will enable them
to absorb any moisture that may be in the system even after the usual
30+min period of the system being drawn down into a deep vacuum to extract
moisture(you also need the vacuum to recharge the system)
If you have a compressor
failure, make sure the engineer does a complete system flush to remove
all metal particles. Most compressor manufacturers/suppliers will void
warranty for failing to do it. Flushing the system is the best way to
start afresh, a clean system, fresh oil and recharging with a know quantity
of gas.
As a rule of thumb,
the minimum pressure in the low side wants to be 15psi, it will work way
lower than that if the pressure switch hasn't shut it down, but around
10-15 psi is required to prevent the system creating a vacuum.
A safe goal for max
high pressure is around the 350psi mark. But if you have an old Lady of
a system and she's showing her age, it is often best to keep the amount
of gas in the system as low as possible so that maximum working pressures
are low and within what the ageing hoses will stand. Ever recharged an
old system only to see it burst a hose and loose all that gas!!!
A ball park figure
for enough kit to test, service & repair basic Air-con systems will
set you back a minimum of £1500. (recovery unit, measuring cylinder,
gauges, sniffer, vacuum pump) Double that to be able to start doing
it properly, i/e flushing kit, dye tracer kit, etc!
Useful links.
AMA
Agricultural
& Mobile Airconditioning, Nailsworth, Glos (crap website but a good
company!!)
Robinair US
giant in air con servicing equipment
Sanden
compressors One of the most popular compressor manufacturers
Wigam
Italian service and maintence equipment
Aircondition.com
(forum) Handy US forum
|
